Blender 3D︰从入门到精通/网格(Mesh)与编辑模式(Edit Mode)
| 适用的 Blender 版本: 2.67 |
网格(Mesh)可以说是Blender中最重要,也是使用最频繁的对象类型之一了。虽说其他类型的对象(比方说像是文本(Text),NURBS patches,等等)也可以被用来对场景或复杂模型的某一部分进行建模,可是它们最终往往会被转化为网格对象,这是因为网格对象能够提供最多的细节控制。也正是因为如此,Blender为处理网格对象提供了比其他对象更多的功能,这既包括内置的功能,也包括可供安装的附加组件。
编辑模式(Edit Mode)是你可以编辑“活动”对象(Active Object)的模式。并非每个对象都有编辑模式(比方说摄像机(Camera)就没有),就算是有编辑模式的对象,在编辑模式下你可以进行的操作也不尽相同。本节主要讨论网格对象的编辑模式。
什么是“网格”呢?
[编辑]一个“网格”由许多“顶点(Vertex,复数形式为Vertices)”组成,每个顶点就是三维空间中的一个点。而两个顶点间可以连一条线段,被称作“边(Edge)”;若干条边如果连接成一个完整的环,就可以被填充成为一个“面(Face)”。正是“面”构成了我们所能看到的物体表面,顶点和边本质上来说是物体必要的几何框架。
显然,一个面至少要由三条边构成。在Blender 2.63之前的版本里,一个面只能由三条边或者四条边围成,或者说一个面不是三角形就是四边形。不过,Blender 2.63引入了全新的BMesh网格系统,所以这个限制已不复存在。现在,你可创建由五条边甚至更多边构成的面。不过,实际上来说,尤其是在创建的模型需要用于动画时,为了使一切功能都运行得很好,你会发觉还是让所有的面尽可能都是四边形为好。

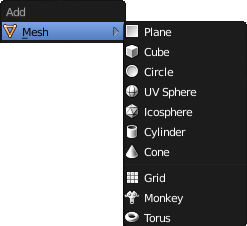
Blender的对象模式(Object Mode)有一个“添加(Add)”菜单(按 SHIFT + A 调出它),里面就有一个“网格”子菜单,其中包括了全部的内置网格对象。你可以选择其中一个和你预想中的模型相似的来作为你建模的起点,然后在此基础上进行修改,这会比从零开始构建网格要容易一些。
编辑模式简介
[编辑]我们首先新建一个Blender文档。如果你能看见操纵器(Manipulator)的话,先按( CTRL + SPACE )隐藏它。现在你应当处于对象模式(Object Mode)之中。 鼠标右键 单击那个默认存在的正方体来选中它,同时使它成为活动对象(Active Object)。
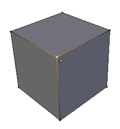
之前说过,可以使用模式选单(Mode Menu)来切换模式。不过在对象模式(Object Mode)和编辑模式(Edit mode)是非常频繁的操作,因此有一个快捷键 TAB 专门为这个操作预留。现在试试用这种新方法吧,你会发觉立方体的外观变成了右图那样,而且模式菜单也提示你进入了编辑模式。再按一次 TAB ,你会回到对象模式。好啦,为了方便一下的学习,再按一次 TAB 回到编辑模式。
现在我们来看一看这个立方体,感受一下网格对象的特点:
- 那些在角落上的点就是所谓的顶点(Vertex,复数形式Vertices)。
- 连接它们的线就是所谓的边(Edge)。
- 而那些由边围成的填充区域就是所谓的面(Face)。
选择模式
[编辑]
在编辑模式中,3D视图(3D View)窗口的标题栏会发生变化以便你可以修改选择模式。你可以尝试依次左键单击那三个按钮,它们分别代表着顶点选择模式、边选择模式和面选择模式。注意你可以按住Shift键来同时启用多个选择模式。
在顶点选择模式中,右键单击一个顶点可以选中它。你也可以通过按住 Shift 键来同时选择多个顶点。如果按住 Shift 键后再次右键单击已经选择的顶点,那将会取消选择该顶点。在没有顶点被选择的情况下,按A键会选中所有顶点;如果已经有顶点被选择,按 A 键会先取消选择所有的顶点。
边选择模式和面选择模式的工作方式与顶点选择模式是相似的。
在三个控制选择模式的按钮右侧的是被叫做“仅选择可见元素(limit selection to visible)”的按钮,当它被激活时,网格对象是不透明的,因此那些在背面的顶点、边和面无法被选中。现在点一下这个按钮,网格对象就会变成透明的了,你可以“透过”正面去选择那些藏在后面的对象。
另外一个在3D视图中非常有用的显示模式是线框(Wireframe),你可以从视图着色方式(Viewport Shading)菜单中选择它或者按Z键开关它。在这个模式中,面是透明的,几乎看不到,而顶点和边就显得更为突出。

这里你可以看到各种显示模式的组合都是什么样的。第一行显示的是一个顶点被选中的情况;第二行显示的是一条边被选中的情况,第三行显示的是一个面被选中的情况。而第一列中,“仅选择可见元素”功能是激活的,第二列中该功能被关闭了,第三列中线框模式是启用的。
快捷键
[编辑]你可以通过 CTRL + TAB 来切换选择模式。 在出现的菜单中,你可以使用鼠标选择,或者通过键盘上的方向键和 ENTER 的方式切换到单顶点选择模式(single selection mode)。使用 SHIFT + ENTER 或者 SHIFT + LMB 这两个按键组合可以在保证原来被选择的内容不被影响的情况下,切换到新的选择模式,就像上面我们所提到的,通过Shift+左键单击的方式选择多个顶点一样。
通常情况下,和所有的呼出菜单一样,你可以通过数字键,如 1KEY 、 2KEY 或者 3KEY 从 CTRL + TAB 呼出的菜单中快速切换到第一个(选择点)、第二个(选择边)、第三个(选择面)选择模式。同时,和之前所提到的一样, SHIFT + 1KEY , SHIFT + 2KEY 和 SHIFT + 3KEY 可以分别切换到点、边和面的选择模式中。
复数选取
[编辑]你可以使用 SHIFT + RMB 来选择多个物件,并且按下 CTRL + I 来进行反选择,就像是在物件模式。 根据选择模式的不同,会决定是多个点、多条线或多个面被选取。 被作用的部分(最后被选择的)会变成白色, 而其他被选择的部分(如果有的话)通常会是橘黄色。
就像上面提到的, A 就像在物体模式下一样,只不过不是应用到整个场景的所有物体,而是应用到正在编辑物体的所有子元素.
隐藏物件
[编辑]H , SHIFT + H and ALT + H work in an analogous way to their behaviour in Object mode. Again, instead of applying to everything, they apply to all parts of the object being edited.
Remembering What’s Hidden: If you switch out of Edit mode with some parts hidden, they will reappear, then disappear again when you re-enter Edit mode. So each object remembers what was hidden when you last edited it.
局部(local)视图和全局(global)视图
[编辑]您可以在编辑模式下切换局部/全局视图,就像在对象模式下一样。然而,不是将视图缩放到一个或多个选定对象,而是将其缩放到正在编辑的对象。
框选(方形选择) & 圈选 (笔刷选择)
[编辑]B 和 C 就像在物体模式下一样起作用, 可以通过画一个方框或者在物体上勾画来多选对象。
选择更多,选择更少
[编辑]在编辑模式下,还有一些其它选择方法。为了演示的目的,我们不使用缺省的立方体,而是新建一个。先使用 TAB 键返回对象模式,删除立方体,现在按 ( SHIFT + A ) 并添加一个 Grid 对象. 按 TAB 切换为编辑模式, 可以看到这是一个由9x9个面组成的网格,当然,也可以说这是一个由10x10个顶点组成的网格。开始的时候,他们都是被选定的,按 A 取消选择,然后按 C 键,在网格的靠近中间的地方随意移动一下鼠标来选择几个顶点(像刷油漆一样,你刷过的地方的顶点被选中了), 接下来按 RMB 或者 ESC . 来结束刷式选择模式,接下来,就是见证奇迹的时刻, 试着按 CTRL + NUM+ (选择更多), 看到了么,发生了什么?靠近原来被选择的顶点的外围一圈的顶点也被选择中!那么,试试 CTRL + NUM− (选择更少), 你会发现处在已选中区域中那些边缘的顶点从已选状态切换为未选状态。
Manipulator, Transformation Hotkeys, Pivot Point
[编辑]所有这些都可以在编辑模式下使用,因为它们处于对象模式,但不是“操纵中心点”按钮。
请注意,缩放顶点会缩放它们之间的距离; 顶点本身没有大小,所以它们不会变大或变小。 类似地,旋转顶点仅改变它们相对于枢轴点的方向,因为无特征点本身没有方向。
Proportional Editing
[编辑]When trying to produce more natural, organic shapes, moving vertices one by one gets tedious. To produce smoother-looking shapes, you need a mode where, instead of a sharp distinction between selected vertices which are moved and unselected ones that remain where they are, there is a more gradual transition from one to the other, where unselected vertices close to the selection also get some movement.
This is where proportional editing comes in. If you look in the “Mesh” menu, you will see two submenus, titled “Proportional Editing” and “Proportional Editing Falloff”. The former turns the mode on and off, the latter controls the choice of falloff function. There is also an icon for it in the header of the default 3D view next to the layer selection. Pressing O will switch between Enable and Disable.
The “Proportional Editing” submenu has 3 options: “Disable”, “Enable” and “Connected”. Do you still have the Grid object you created in the “Select More, Select Less” section above? If not, add a fresh Grid object. Switch to Edit mode, and ensure that just a few vertices in the middle are selected. Enable proportional editing, and now use G to move the selected vertices. You should notice 2 things:
- unselected vertices near the selected ones also move, and
- there is a white circle enclosing all the vertices that undergo any movement.
Try using the mouse wheel while moving the vertices, and you will see the white circle grow or shrink, and the region of influence of the proportionality grow or shrink correspondingly.
Also try different falloff functions in the “Proportional Editing Falloff” submenu; some ensure that the mesh stays smooth and curvy, others give a more angular effect, and so on.
The third option to “Disable” and “Enable” proportional editing is “Connected”. This one makes a difference in more complicated meshes, which might have folds or concavities in them. In this situation, “Enable” affects all vertices within a particular distance of the selected ones, while “Connected” only measures the distance via connected edges, rather than directly through space. This lets you move one part of the mesh without affecting another part which might be located nearby purely as a result of a fold.
Of course, proportional editing works with scale S and rotate R operations as well.
Deleting Things 删除物件
[编辑]
Now, let’s try deleting parts of a mesh. This is the menu that comes up when you press X or DEL when editing a mesh; we will concentrate for now on the first three items.
现在让我们尝试删除网格的某些构成部分。当你在编辑一个网格物件时,按下 X 或 DEL 会看见如左图的选单。我们现在专注于前三个选项。


First of all, go into face-select mode. Select just one face of the default cube, press the delete key, and select “Faces”. As shown in these screenshots, the selected face should disappear.
首先,使用 CTRL + TAB 进入面选择模式( face-select mode ),从预设的立方体选择一个面,按下 DEL 键并选择面( Faces )。如撷图所示,刚才选择的面( face )已经消失了。


Use CTRL + Z to undo your previous deletion. Now go into edge-select mode. Select just one edge this time. Press delete again, this time select “Edges”. As the screenshots show, the selected edge disappears, but the faces bordering that edge also disappear. Faces cannot exist without their bordering edges!
使用 CTRL + Z 还原( undo )你刚才执行的删除操作。现在进入线选择模式( edge-select mode )。选择一条线( edge ),并再次按下 DEL 键并选择线( Edges )。如撷图所示,刚才选择的线( edge )已经消失了,然而,以该线条为边界的面也跟着消失了──失去边界的面便无法存在。


Use CTRL + Z to undo your previous deletion again. Go into vertex-select mode. Select just one vertex, make sure it’s the one closest to you so you get the best view of the effect. Press delete, and select “Vertices”. Not only does the selected vertex disappear, but also the edges connected to that vertex—edges cannot exist without their endpoint vertices. And since those edges disappeared, the faces that were depending on them to be their borders had to be deleted as well.
使用 CTRL + Z 还原( undo )你刚才执行的删除操作。现在进入端点选择模式( vertex-select mode )。选择一个端点( vertex )──为了取得最好的观察视野,请确保它是距离你最近的一个端点。按下 DEL 键并选择端点( Vertices )。不只是选择的端点( vertex )消失,与其相连的线( Edges )亦然──失去终点的线段便无法存在。同理,以消失的线( edge )作为边界的面( face )也必然一起被删除。
So, to recap:
* An edge cannot exist without its endpoint vertices.
|
Undo/Redo
[编辑]You can undo your last Edit-mode operation with CTRL + Z , and undo your undo with CTRL + SHIFT + Z , similarly to Object mode. However, Edit mode maintains its own undo stack, separate from the Object-mode one; to undo/redo an Edit-mode operation, you must be in Edit mode, not Object mode.
你可以使用 CTRL + Z 还原( undo )在“编辑模式”下最后的操作;此外,你可以透过 CTRL + SHIFT + Z 重作( redo )已被还原的动作──类似在“物件模式”中的操作;然而,“编辑模式”与“物件模式”均各自管理其还原纪录堆栈。要还原( undo )或重作( redo )一个在“编辑模式”下的操作步骤,你必须在“编辑模式”中,而非“物件模式”。
Adding Things
[编辑]Back to the default cube, and Edit mode. Ensure you are in vertex-select mode, with nothing selected. Left-click with the control key down ( CTRL + LMB ) somewhere near the cube. Do you see a little orangey-yellow dot appear where you clicked? You just added a new, unconnected vertex to the mesh.
Undo your addition ( CTRL + Z ). Select an existing vertex with RMB . Now CTRL + LMB to add a new vertex again, and you will notice that it is connected to the previously-selected vertex by a newly-added edge as well. Since the newly-added vertex is now the selected vertex, doing CTRL + LMB again at another position, and so on repeatedly, lets you construct a whole chain of new edges in this way. But what good are edges and vertices without faces?
To construct a face, you need a closed loop of edges. To close a loop of edges, select all the vertices in the chain, and press F ; this will add another edge joining the first and last vertex into a complete loop of edges, and at the same time it will fill in the loop with a new face.
Alternatively, if you just wanted to close the loop without filling in the face, then select only the first and last vertex in the chain before pressing F ; since only two vertices are selected, this will not construct a new face, it will only add an edge joining those vertices.
You can also extrude entire new sections of mesh with a single click in this way. Try selecting two adjacent corner vertices of the cube (i.e. ones joined by an edge). Now CTRL + LMB near to them, and you will see you’ve created two more vertices, joined to the previous two by a new face. CTRL + LMB again, and you can construct a whole sheet of new mesh in this way.

Undo all your additions, and get back to the pristine cube. Now select all four vertices of a single face. CTRL + LMB near to your selection, and now you have added four new vertices (corresponding to the original four you selected), plus a new face connecting them, plus four new faces connecting them to the original four. (You may not notice it, but the original face formed from the original four vertices has been removed as well.) Another CTRL + LMB does the same thing again. So with just a few clicks, you started with a cube and ended up with something (see at right) that is starting to resemble—who knows? A square-cross-sectioned piece of somewhat wonky-looking pipe, perhaps?
Simplifying Things
[编辑]It is possible to remove vertices without leaving holes behind in the mesh, by merging two or more vertices into one. Select the vertices you want to merge, and press ALT + M ; a menu will popup with some options, including whether to position the resulting vertex in the middle of the ones being merged, or at the position of the first or last one you selected. The resulting vertex inherits all the edges that were connected to the vertices being merged, as well as the faces connected between those edges.
Alternatively, sometimes an operation might create duplicate vertices in exactly the same positions, or very close together. You can merge these en masse by ensuring you have selected all possible candidate vertices (e.g. the whole mesh), bringing up the Vertex Specials menu ( W ) and selecting the “Remove Doubles” item. Look for a message to flash up briefly in the Info window, saying “Removed n vertices”; if n is 0, then nothing was done. But if you look in the lower left of the Toolshelf, you will see a “Remove Doubles” panel has appeared, with a “Merge Distance” slider that governs the maximum distance allowed between vertices that are merged; change this value as appropriate (either by clicking on the left- and right-arrows, or by clicking and typing in a new value and pressing ENTER ), and the Remove Doubles operation is immediately redone, and a new message will flash up indicating how many vertices were removed this time. Simply keep on adjusting the value until you are satisfied that you haven’t removed too many or too few vertices.
